Construction
Back to the main Pond page.
As I was planning and building my pond I found that I wished for more photos of ponds-in-progress; to see if what I was doing was anything like what others had done. What follows is an index of pond construction photos. Nothing artistic; but, with luck, informative.
Click on the thumbnails for a larger picture. Click on the big picture to return to this page.
 | This is the Koi pond at the Ananda Cottages in Ubud Bali. One of the reasons I decided to build a pond of my own. |
 | Step One: I dug a four inch deep trench to outline the pond and stream and poured concrete. The concrete would serve as a solid foundation for the stones that would later edge the pond. |
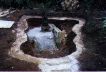 | Step Two: I dug out the pond within the outline defined by the concrete rim. What the books don't tell you: You are apt to come across the "rock from Hell". Mine was about the size of a '61 Volkswagen. Rather than remove it, and in the spirit of great programmers everywhere, I turned this "bug" into a "feature". Here it is coated in mortar to protect the upcoming pond liner. "Son of Rock-From-Hell", excavated from the pond appears outside the pond at the top of the picture. |
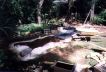 | Step Three: Laying the liner. My "pond" consists of a larger pond, about 1 meter by 2 meters, and a short stream which flows into a very small pond. The small pond contains the pump, float switch and auto-fill float valve. Start laying the liner (45 mil EPDM in my case) at the lower end of the water coarse. I used an underlayment that consisted of old newspaper, cardboard boxes and an incredible number of MacWarehouse catalogs. |
 | Step Four: Once the liner is in you can begin to fill the pond with water and attempt to smooth out the liner. This will not work. You will end up with endless creases, folds and pleats. Don't worry. You will get used to them. When the liner is finally in place, your can mortar in your edging stones and/or coping. At the left of this picture you can see the brick edge of my "observation point" -- a flat area where folks are supposed to stand and get close to the pond, admire the plants and feed the fish. |
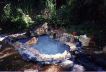
 | This shot shows the small pond (home of the pump) and the short stream flowing from the large pond. You can clearly see the "observation point" in this short. You might also spot some stone sculptures from Bali that guard the pond. The pond is filled with fairly pure rain water and has always been remarkably clear. |
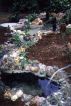
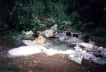
 | Here you get a good idea of what a mess things are while under construction. The peculiar water color is due to all the mortar that I slopped into the pond while placing the rocks around the edge. All the rocks were scavenged from my rather untidy one hectare tropical farm. I've got plenty if you need any. Incidently, some of the books say don't trim the liner, just bury the excess. Forget it. Trim it or you will be forever running into it as you do your landscaping. |
 | This nicely overexposed shot shows what the pond looks like with major construction finished. The rocks are in place, the liner is trimmed and buried and we're ready for the "real" water, the landscaping and the aquatic plants. Note the rather lush pre-existing flora -- the result of twenty years of sloth. |
 | Another overexposed shot shows the stream bed after it had been lined with rocks and filled with gravel. The stream flows from the main pond into a minor pond which hosts the pump. |
 | Here's the bridge, under construction. The frame is treated four by fours, anchored in concrete. The surface is split bamboo harvested from the back yard. The bamboo won't last long, so has been installed with easy replacement in mind. |
Back to the main Pond page.